Showing posts with label Woodworking. Show all posts

Monday, 19 November 2012

Snowman Family

Well it is here again,  my favorite time of the year.  My Goal this holiday season is to do Twelve holiday crafts, baking or gifts to share with you.

For my first one I decided we needed to have ourselves a little 2x4 snowman family.  This was fun for the kids as they got to help out with sanding and picking out their button colors. 

This was such a fun project to do.  Truly the hardest part was figuring out what size they should all be. 


I used 2x4's for most of the snowman and then 1x4 for a part of the hat.  I simply glued all the pieces together and waited patiently for them to dry.  


Once they were all dry each one got two coats of paint and a little sanding. Then it was time for the kiddies to head down to my paint drawer and figure out what color of buttons they all wanted.
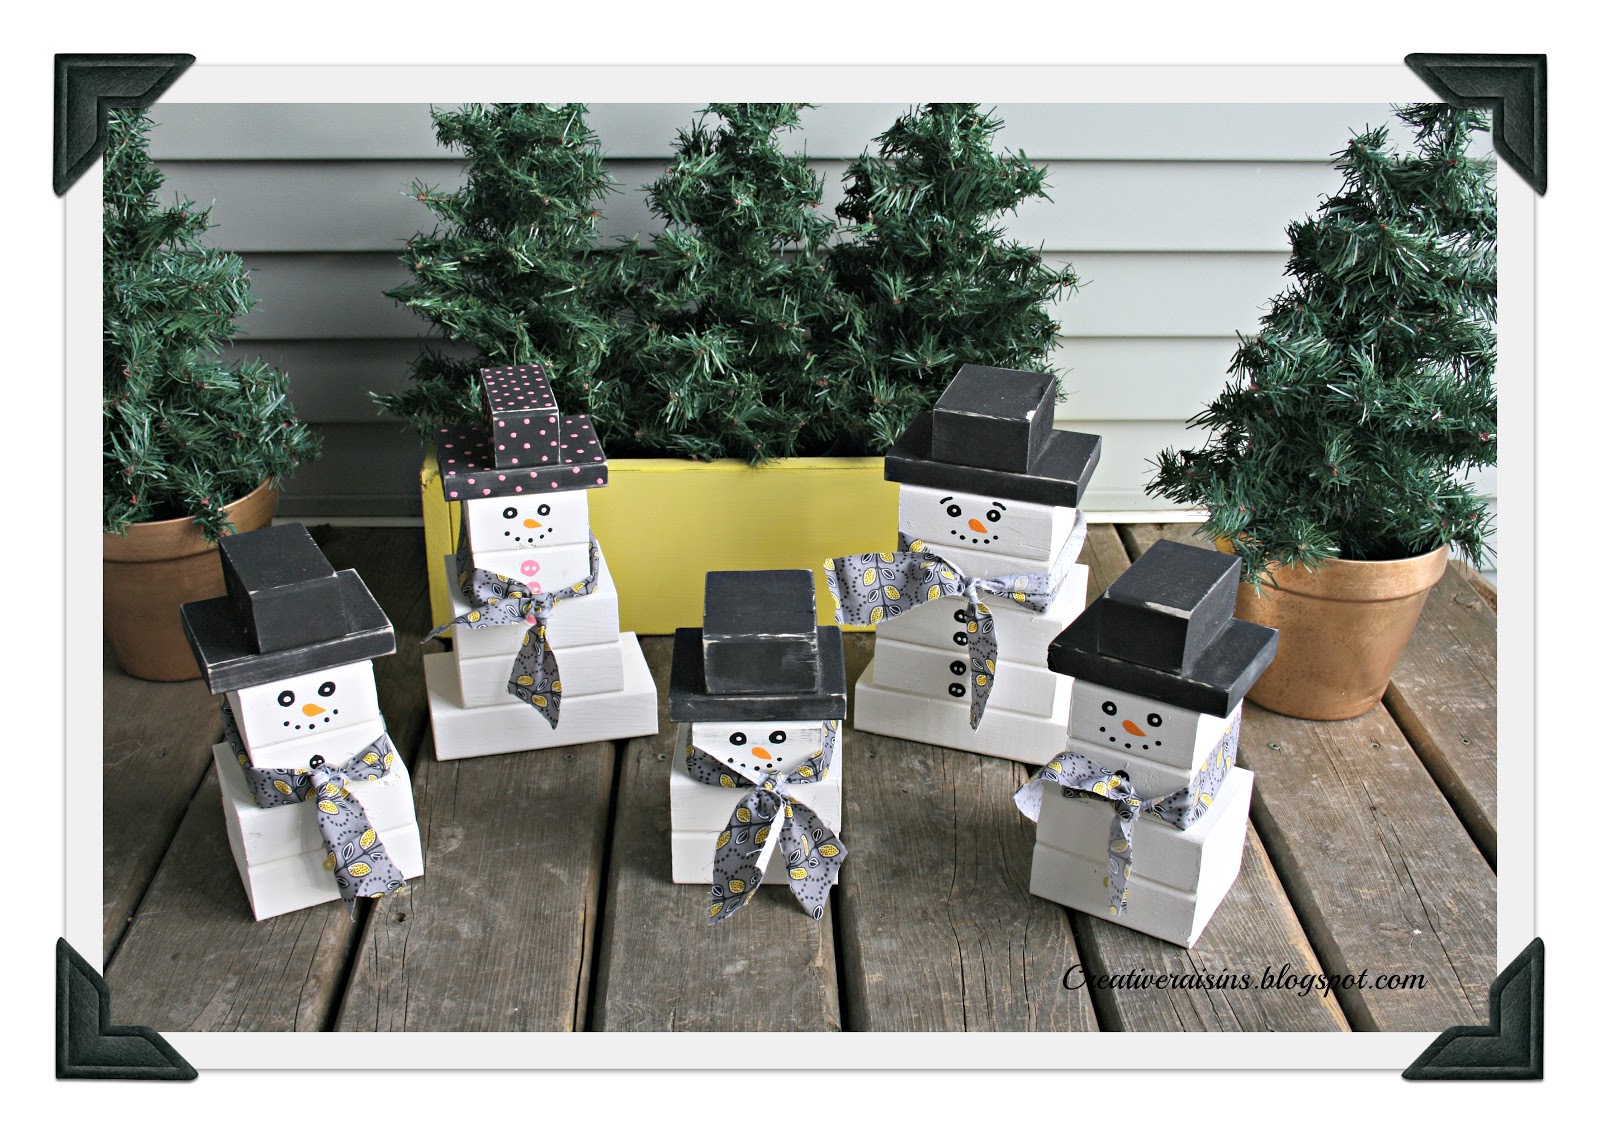


  Aren't they fun

Hope you Enjoy


Saturday, 28 July 2012

Watch Me Grow

Oh could there be anything better than seeing how much your children have grown, it is actually amazing how quickly it happens.  My kids love to get measured.

  This time I have made two different Height charts, one for a little princess who turned one.  And one for my niece and nephew who have moved and now have room to put one up.  


For the numbers I like to go up by 2 inches so that it doesn't feel to cluttered.  I finished it off with a few fun flowers on each end. 

For this one I wanted to make it gender neutral so I went with a simple design using black lettering and no extra decals.  


The thing I like about these movable growth charts is that it doesn't matter if you have to re-paint or you move you can always take it with you.  Trust me I have made the mistake of doing this on the wall and then moving and having to leave behind.   


Wednesday, 20 June 2012

Pretty In Pink Card Box

Oh how excited am I to be a part of such a wonderful day.  My cousin and his wife are celebrating their 10 year wedding anniversary this month and they are throwing a big party.  

Us girls say make it look pretty and he says keep the cost down and make sure the bar is stocked.  Why can't there be both.  

They don't want gifts but I figured people might bring cards so I made this card box for all those wonderful cards.


The colors are bright and fun so I added a little bit of the pink to the box to add just a pop of color. 


The party is next weekend so I will be sharing some of the fun ideas we came up with for this party throughout the week.  

Wednesday, 30 May 2012

Planter Box

 I am sorry I have been a little MIA lately but wow the past couple of weeks have been a little crazy.  We have been on a hunt for some new property, headed out for our first camping trip of the year, had a year end concert, and started our first season of football spring training.  Man I think I am just tired writing it, lol. 

So thank you all for sticking around and being patient.  

Today I figured I should get going on some projects, I have a few on the go but can't post some of them just yet.  


This was an easy one to do.  I used 6x6 boards cut to size and then with a little glue, nail gun and some good old paint. A simple and easy planter box filled with pretty flowers.

Just wanted to share with you a little snippet of my busy week.  Keegan decided to give football this year, he was a little bit worried about getting hit.  But after 5 practices he has come home after each tackling day and says he loves it the most, go figure. 


Also tomorrow I am going to be having my first ever give away so keep an eye out for that.


Thursday, 10 May 2012

Gardening Tool Box

For every good Birthday Party you have to have a good party favor bag


Every year I try to come up with something a little different, something that the kids can use and personalize them.

This year for my sons buggy party I decided to make these fun Gardening tool Boxes.  Each tool box included a gardening shovel, bag of dirt, a pot and a package of seeds.


For this I got all the kids involved helping me.  Makai helped get me the wood to cut, then we would pass them over to Keegan who would sand all the edges and last we would hand them off to Chase where he would stand them up together and let me know how many more pieces we needed.

If you want to make your own here is what we did.

We used 
1x6 cut at 12" for the bottom
2 - 1x6 cut at 9" for the side.  I then measured 2" down and cut on a 45' 
2 - 1x4 cut at 12" for the sides
1 - 5/8" dowel cut to fit I believe this worked out to 13.5" long.  

Once I had all the pieces it was just a little wood glue and an air nailer to put it all together. 


Each one of the boxes were painted.  I decided on Brown for the boys and Pink for the girls and then finished off with their names stenciled on the front. 

The next day my kids got right to work putting their seeds into the pots and are waiting for them to grow. 


Monday, 31 October 2011

Man Room Built in TV unit

I am so beyond excited to share this project.  It has been a year in the making, and it is finally finished.  Let me start by saying this couldn't have been done if it wasn't for my husband who was the builder of this fantastic unit and my dad who helped us out with the crown moulding to finish it off. 

It may have taken a little bribing of a large TV with no home for it to go but it was well worth it.

I am not a fan of the big speakers but I was told they had to be there as it is a man room and all.

After researching many different options and styles we came up with this one.  It was build as one large piece and then pushed back into place. 

  Just as I was starting to paint


First Coat of Primer went on


This unit took a few coats of paint to get the color I wanted to achieve.  First I started with a dark base and then after seeing it I wasn't to crazy about it.  So I reversed the colors and did the base in the light and then mixed the darker color with a glaze and brushed it on. 


I still need to fill some of the spots on the shelves but haven't been able to find what I want yet. 

Thursday, 13 October 2011

The Start to a Perfect Office Area

I am so excited that I have finally finished this project.  Like I said before this has been a thought process for about 6 months and the desk is finally done.


I am so happy with the finished product it is perfect for the space.

Before
Our office area is just at the bottom of the stairs when you enter the basement.  Before we had this large corner desk that took over and looked so messy all the time. 


Thanks to Ana White  I found the idea for the bottom base with a few tweaks to make it my own.  I found these banister rails at a local Habitat for Humanity store for $3.00 Each.  I made the main part of the top just out of a piece of left over plywood.  


I then framed out the top with 1x2's and used 1x4's to finish off the top. 


 Don't you just love this color, a little white was and it was perfect.


Then came the fun part, I bought this tin from the local hardware store cut it out to size and after some research on discoloring and a few trials to see what would work.  I sprayed the tin with some oven cleaner and left it for the night. 


With a little hard work from the palm sander I sanded off all the oven cleaner that was dried on which gave me the look I wanted.  But to give it a little more personality I put a little bit of watered down paint on and then gave it another quick sanding. 


The front door I decided to just leave with no color and love both looks. 


I just need to add some accessories and wall art to finish off my little office corner.


Sunday, 2 October 2011

A sneak peek at what I have been working on

I just wanted to share with you a little sneak peak of my newest project.  It is finally starting to take shape and I cannot wait to show you the finished product.  


This computer desk has taken many months of thought of how I would do it.  I wanted something that would hide my ugly tower, subs, and all the other stuff that goes with it.  I couldn't find what I wanted in a store that looked pretty enough so I decided to make it myself.  

I am just in the process of staining and painting so hopefully in the next couple of days it will be done.


Friday, 29 July 2011

Some more fence Decor

Okay so have I told you that I am in love with 1x4's.  They have endless possibilities, they are inexpensive and so easy to work with.  I have been back and forward to Rona numerous times getting 2 or 3 at a time.  They yard guys are starting to look at me funny, lol.  

I have been building this fantastic wall on the back of my fence, my plan is to fill two panels with some kind of  art.  It really has started to make the space feel like a cozy backyard and a whole lot more personal.  This week I made these boxes by simply cutting some 1x4's to my desired length and then tacking them together with a nail gun.  Give them a quick paint job and finished.  The painting actually took longer than building them.


 I had these terracotta pots stashed under my deck for the past year, they were originally painted blue and white, so I added a splash of green color to the top and once dry I sanded them a bit to give them a worn look. 


This weekend we are packing up the trailer and heading out for my annual family camping trip, we are looking forward to a weekend away.   I love long weekends. 

Hope you all have a great weekend!!!

Thursday, 30 June 2011

Finished Playhouse

The Playhouse is Done!!!! 

I am so excited to share this finished project with you, like many project I do it starts with a little idea and then snowballs into something way bigger.  If my husband had it his way we would have thrown up the walls, slapped a little paint on it and called it good.  I think my vision turned out better than his.  


The Grocery Store was a complete surprise for the kids, they love to play store so I thought it would be perfect in here.


I love these signs they turned out great


I searched high and low for food to go in the playhouse but all that I could find was a ice cream package and some fruit and veggies so I decided to make my own felt food.  These were my first attempts.  I have many more to make for the kids but I ran out of time to get it all done.  Plus I couldn't make them wait any longer to see it. 


I found this cute ice cream kit at Ikea


This bench was made for the kids playhouse by their Grandpa,  I store all the extra craft stuff in here.


I couldn't do a playhouse without a craft table for the kids, they love to craft just as much as I do. 


I found these cute buckets at easter time as stocked them away for this very project.  The hooks I picked up from the dollar store. The trick is to see if the stuff will actually all stay where it is supposed to go. 


I tried to make everything have a little vintage feel to it.  One of my favorite projects so far.

 I finished this late last night so this morning I got the kids up and first thing they got to do was check it out.  The looks on their faces is what makes this all worth it.  I know they are going to have so many hours of fun and create so many memories in this space.