Showing posts with label Wood Crafts. Show all posts

Saturday, 28 July 2012

Watch Me Grow

Oh could there be anything better than seeing how much your children have grown, it is actually amazing how quickly it happens.  My kids love to get measured.

  This time I have made two different Height charts, one for a little princess who turned one.  And one for my niece and nephew who have moved and now have room to put one up.  


For the numbers I like to go up by 2 inches so that it doesn't feel to cluttered.  I finished it off with a few fun flowers on each end. 

For this one I wanted to make it gender neutral so I went with a simple design using black lettering and no extra decals.  


The thing I like about these movable growth charts is that it doesn't matter if you have to re-paint or you move you can always take it with you.  Trust me I have made the mistake of doing this on the wall and then moving and having to leave behind.   


Friday, 9 December 2011

For All Their Hard Work ~ Teacher and Coach Christmas Gifts

This truly is my favorite time of year.  Every year I try to make something for the teachers and our coaches as they work so hard and put a lot of time into my children.  Between all of their school teachers, music teacher and Karate teacher we had a total of 12 gifts to make this year.  

This year I wanted to share a little HOPE.


I started out by cutting all my wood using 2x4's and 2x2's.  With 12  to do there was a lot of blocks. 

I started by painting all the blocks.  I am sure my husband was happy when that part was done as I had them throughout my kitchen for a few days.  
Once that was done I used vinyl stencils for each of the letters and then sponged the letters white.
My favorite part is sanding the blocks, although it takes awhile I feel like it gives them the worn look I  like. 


After helping me to take all the vinyl off my children just couldn't resist making a big train with all the blocks.  


I know this picture is a little blurry but I had to share it.  Makai wanted to help me so I said he could carry the blocks upstairs so he stacked them as high as he could and told me "Don't worry mom, I will use my neck to hold them"  I think this was just about as far as he made it.   


I really hope all the Teachers enjoy their little piece of Hope.

Tuesday, 6 December 2011

Oh Christmas Tree

Christmas Is absolutely one of my favorite seasons to decorate for.  It is just built into me.  My Grandparents have an entire attic filled with Christmas decorations, my dad loves to decorate it is just a part of me.  If I had it my way we would light up the house like the Griswalds but my husband has politely said no to that, lol.  Each one of my children have their own Christmas tree to decorate and make special in their own way.  I just love it.  

I have seen many different interpretations of the wooden Christmas tree and I just loved it so much that I needed one for myself.


 I am not a tradition person when it comes to Christmas colors so I wanted to keep with the bright pinks and greens colors for this project. 
This was such an easy project to do and the it turned out exactly how i wanted it.

Saturday, 12 November 2011

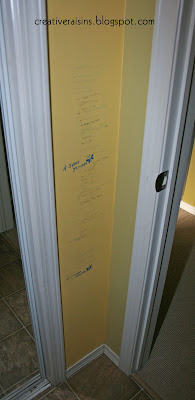
Garage Entry Part 1 ~ Watch Me Grow

Okay here is is the tiniest boot room ever.  I am sure I am not the only one out there that has this.  Can you believe it that when we built this house the laundry room was supposed to be in here as well.  I can't even imagine walking in with dirty boots and laundry.  


This space is so tiny and was in need of a makeover, but my biggest problem was that since we moved in her 5 years ago I have been using one of the walls in here as a growth chart. 


So as an alternative I decided to make a growth chart.  So I started by sitting down and marking out all of their previous heights so I can add them back onto the new growth chart.  

Then I gave the entire room a fresh coat of paint. (It is actually more grey in person)


If you follow me you know how much I love to use 1x4's they are so easy to work with.  I needed something that wasn't to wide for the space I was working with so this was perfect.  I gave it a coat of white and sanded the edges and finished off with a wash of brown paint. 


When Measuring out the heights I wanted to start at 12 inches and go up by 2's.


I used a silver vinyl to make all the numbers and ticks on the board.


 I topped it off with Watch Me Grow on the wall in vinyl.


All that is left is to add their previous heights and to continue to let them amaze me and watch them grow.

Stay tuned because I have more coming up on this transformation. 

Friday, 4 November 2011

Stocking Holders

Well as the snow has fallen today I feel it only fitting to start posting some Christmas crafts and to check another project off of my to-do list.

Although I don't have a fireplace mantel to hang my stockings on I do have a few other places in the house that this will work.  I have searched in the past for stocking holders and every year I think $20.00  for each one and five family members is just to outrageous.  

So what is a girl to do?

This is what I came up with


So easy to make right?


I decided to finish them with a simple look using just white because the stockings I made are so colorful.  I had an extra 2x4 in the garage so I cut it up to the size I needed and found these cute cardboard trees at a craft store for $1.50 each.  I gave each of them a coat of gold and added the gold hook to match. 


I can't wait to get the stockings done so I can show you those as well.  

Friday, 9 September 2011

Family & Love Blocks

Before I head of for a weekend getaway with my hubby I thought I would share with you my latest project.  I have this massive entertainment unit (which I will share with you once the crown molding is done) and it has a lot of shelves to fill.  So I decided to create these Family & Love Blocks to put on it.


 Notice the faux books and the fantastic green apple behind them, I just found them last night at home sense.  


 I started with these 2x4's that I cut down to different sizes, and gave each one of them two coats of paint. 


Once they were all dry I sanded the corners and edges but decided that the colors were to bright so I painted over them with a watered down brown paint to darken the edges and the colors. 


I brought out the good old vinyl machine and made stencils for each block and stenciled them on in a white paint.


I hope everyone has a fantastic weekend. 

Wednesday, 17 August 2011

Karate Belt Display

My Oldest son has been in Karate for the past 3 years and has been accumulating Karate belts.  I have put them aside and tried to come up with something to present them and show all his hard work. 


I wanted to incorporate his belts along with pictures of him throughout the years at his belt ceremonies.  I started with a simple box and then added in the cubbie and finished it off with backing the photo boxes with scrapbook paper and the pictures.  

Wednesday, 10 August 2011

Letter R & Theater Room Picture Wall

It all started with this letter R and grew from there  

I had some scrap plywood in the garage so I drew out a large letter R and then gave the jigsaw a whirl for the first time. 


Okay yes I know it isn't perfect but I guess that's what I like about it, the imperfections just adds character to it.  Once I got this cut out my poor letter R went through an identity crisis, first it thought it wanted to be white, than black and finally it ended up deciding on Red with a touch of rustic.  


I think the red Suits it


This fantastic "R" needed a little bit of company so I grouped it with some pictures of my husbands motorbike.  I edited each picture in photoshop different so they were not to matchy.


I like the chrome looking one, has a cool vintage look to it. 


I wanted to add a touch of yellow so I used fabric that I painted and then used as a back drop to this black and white picture. 

Sunday, 24 July 2011

Front Porch Makeover #3 ~ Planter Boxes

This was another one of those "Honey I have an idea" moments.  I wanted to build something that would house my ugly plastic planters so I could have them on the deck.  I came up with this design using some 1x4's, 2x2's  and some leftover cedar planks.    


I am by no means a builder but I thought I would give it a try.  My first task was to build the box and then come up with the rest of it later, I figured if I had something to put it in the rest would come to me later lol.  Once this was done I had to come up with an idea of how the legs would work and how to make this sturdy enough to not tip over.  


I painted them with a nice bright blue and then gave them a white wash paint effect. 


Each Planter box cost me $12.00, so not to shabby for a cute little item.

Monday, 20 June 2011

Teacher Appreciation Gift ~ Garden Stakes

Not that I am counting or anything but only 1 more day of pre-school for my little man Chase and 6 1/2 Days Left for my Bigger Little Man Keegan.  I cannot wait for summer break to start and neither can they.  We have alot of people to thank this year, between Chase's Teacher, classroom helper and classroom Aides he has 6.  Keegan has 1 teacher, 1 bus driver and 1 Karate Teacher.  So that is a total of 9 gifts, plus I volunteered to do 5 more for a family friend.

Garden Stakes 


I Love these they turned out so good. 

 I started by taking an 8ft strip of 1x4 and cutting them down to my desired length.  I was able to get 5 out of 1 length


Then the painting assembly line started. I painted some of them with a black base and some with white and then finished them off either with a blue or a white top coat.  Just to have a little bit of variety.  
This was the most time consuming part of the process as each coat had to be dry before it could be turned and have the other side painted.  Also because I did different layers of paint.  


Once the paint was dry I sanded the edges and the faces to make them look a little weathered.


I used a vinyl stencil then painted the wording Black 


I also sanded the wording too and then added the blue stakes to it and finished it off by spraying them with lacquer.


Our teachers do so much for our kids that all the time spent making these was well worth it.